Adventures in Restringing
- Jun 21, 2025
- 6 min read
Updated: Jun 25, 2025
One of my biggest doll collecting fears is somehow messing up one of my dolls -- especially if that doll is retired. Two of my favorite dolls, Kanani and Cécile, no longer have replacement heads available at the American Girl Care Center, and even the replacement bodies don't really match their skin tones (or at least Kanani's, I'm not sure about Cécile's). So because those dolls are now truly non-replaceable, I've been really afraid to do anything to them that might result in accidental damage.
I had Kanani with me back when I lived in a non-air-conditioned apartment. Even though my husband and I were only there for about 3 years, it was plenty of time for the heat to do a LOT of damage to some of my favorite things. My poor Magic Attic Club Megan doll -- my first and only childhood 18" doll -- should have been safe in my closet, but was instead practically baked thanks to the apartment's lack of insulation. Her eyes became yellowed and the heat destroyed her elastic.
Kanani initially seemed fine after she moved with us to our new (and thankfully air-conditioned) place, but over time, it became clear that the heat had really exacerbated her elastic's degradation, too. Last year, I noticed that Kanani's leg was finally dangling out of its socket. Cécile, who had been somewhat loose limbed since I got her was also starting to have a hard time standing on her own. The time had come. I needed to tighten their limbs or keep them as display-only until I could fix them.
First, I needed to practice. While I was making my custom Ariel, I used her original (Elizabeth) body to practice the "hair tie method," the easier of the two usual limb tightening methods. For this method, you pull the arm/leg elastic tighter and wrap a hair tie around the space between the tension cup and the old knot/ferrule to create a new "knot" that holds the elastic tightly in place. It doesn't require any special tools -- just a hair elastic -- but you are basically taking partially spent elastic and making it work harder. In the practice body's case, the doll had been so lightly used, I was sure the elastic still had at least a few more years left in it. And to be honest, tying hair ties is a lot less daunting than using ferrules and crimpers for a complete beginner.
The practice body also gave me a chance to try out re-stuffing. Looking back on it now, I did a dismal job. I didn't push enough stuffing into the base of the torso, and I didn't distribute the stuffing in all of the areas I should've, so the result was a doll with a flatter butt and football player shoulders. I've learned a lot since then lol...
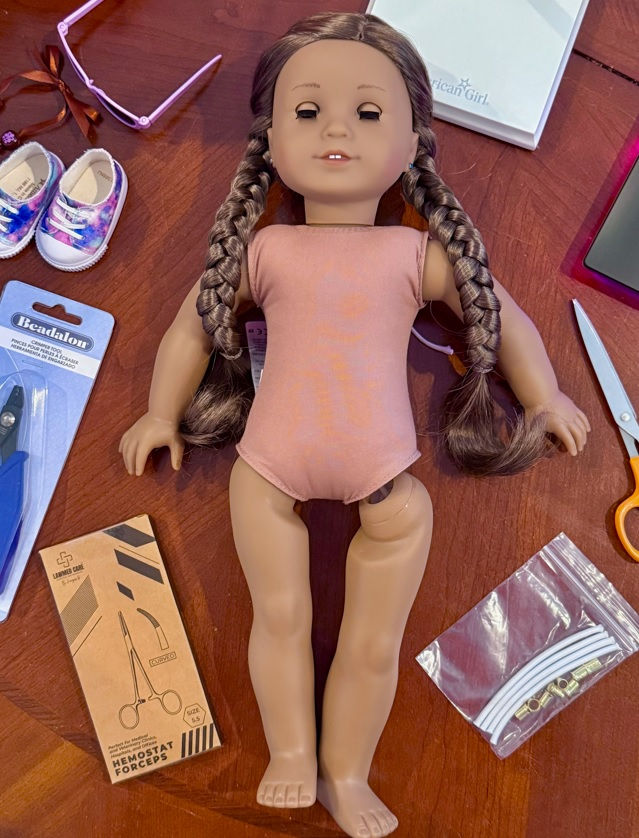
With the knowledge I'd gained from practicing and watching several videos on doll restringing and re-stuffing, I felt nearly confident enough to pull the trigger and fix my dolls. I was still really nervous about one of the initial steps, heating up the limbs to be able to remove and replace the tension cups. None of the tutorials are really specific about the temperatures they use (it's more of a test the squishiness process), and the tension cups seem like they could break easily if you're not careful.
Then I came across a tutorial that didn't require heating the limbs! How to Restring a Modern American Girl Doll Tutorial (Hard Vinyl Limbs Reattach Legs Arms) by Acacia Lane Dolls skips that step and has you use hemostat forceps to reach around the tension cups and grab the elastic. She made it look so quick and easy, I finally felt confident enough to try it for myself. I ordered her kit off of Etsy, some hemostats off of Amazon, and waited on pins and needles for everything to arrive. I had a hard time finding crimpers. The ones I found at Home Depot were more than I wanted to spend, and the ones I ended up finding at Michael's weren't wide enough to fit around the ferrule. To rectify this situation, I ended up using a two-step crimping process. I started the closing process using some pliers from my husband's computer repair kit, and then finished clamping the ferrule using the crimpers.
Before you begin, I recommend measuring your doll BEFORE you un-stuff her. I took three measurements: the circumference around the butt/hips area, the middle of the torso, and around the arms and chest. When you're done re-stuffing the butt, measure before continuing on to stuff the torso, and do the same before starting the chest. Check your measurements at the end and try to get them as close to the original as possible.
Kanani, being the most in need of new elastic, went first. I watched Acacia Lane Doll's video a few times before starting, but the process went something like this:
Cut off the doll's limbs using a scissors (this felt SO WRONG!)
Un-stuff the body and set the stuffing aside for later. Fish out the tension cups and old elastic.
Use the hemostats to carefully pull out the old elastic from each limb.
Clamp a new ferrule to the end of a piece of new elastic with the lip of the ferrule facing toward the majority of the elastic.
Take each limb and shake the tension cup inside until the rounded part is facing the opening of the limb. Carefully fish the long end of the elastic into the hole.
This is the tricky part... Push the hemostats beyond the cup and grab hold of the long part of the elastic. Carefully pull the long elastic out so that the cup turns around (curved side facing the inner part of the limb), and the elastic is sitting correctly (small end with ferrule is inside the limb).
Once you've done that for all the limbs, it's time to attach them to the torso. Acacia Lane Dolls recommends starting with the legs, and I agree. Pull the long piece of elastic through the leg or arm holes, then add a tension cup so that the curved part is facing up (I think she calls it "two domes" on top of each other -- the dome of the leg/arm openings and the dome of the tension cup).
Add a ferrule with the lip facing the dome.
Use hemostats and crimper to pull the elastic tighter with one hand and crimp the ferrule in place with the other. Note: Make it tight, but not too tight or your doll will make noises when you move her limbs. I've also heard it can make the legs aim inward instead of straight up and down.
Once all limbs are reattached, test your work, and then re-stuff the body.

I expected restringing to be the hardest part, but I'd say re-stuffing was harder! It took a LONG time to get the torsos back to the same shape they were originally and make sure there weren't any weird bumps or lumps anywhere. I went slowly, adding small bunches of stuffing at a time. I used a chopstick to help push the stuffing into place and really pack it in. It's amazing how much stuffing one doll has! You keep thinking there's no way you can fit it all back in and then somehow, you do! At times it was easier to use my fingers or thumb to help move the stuffing into place -- especially around the arms and legs, and when I was trying to add the final stuffing down the middle of the torso. Take your time, measure, and make sure you're happy with the results before you knot the head back on.
I'm happy to report that both dolls are now back in action. I have Kanani upstairs in my display case, showing off her newly restored flowing curls, and Cécile is in my downstairs bookshelf, looking ready for summer!
These two gave me so much confidence, I was able to take my restoration skills a step further and tackle an even bigger restoration project... ;) I'll be posting about her soon!


